
Summary – 8 Steps to Submitting an App to the App Store
- Review the Apple App Store guidelines
- Test the app before submitting
- Register for Apple’s developer program
- Set up your App Store Connect account
- Create your app store listing
- Upload your iOS app to the App Store
- Submit your app for review
- Release your new iOS app!
Let’s say you’ve reached the final installment in the creation of your digital product. The UX journey passed flawlessly – the app flows and the user goals were defined. You managed to get through the hot debate, where you pondered if you should choose native mobile development or React Native for your product. For a gaming platform, you probably had to pick between Unity or Unreal Engine. The app is now basically done, and all you have to do is to launch it by submitting it to the app stores.
Since iOS mobile app development is something we know lots about, we wanted to share with you the main steps of submitting your app to Apple’s App Store. Though our main advice is to test, re-test and then test again, there are a few other crucial steps to follow before you release an iOS app. We’ll go over each one to help you get your app in the App Store for users to enjoy.
1. Review the Apple App Store guidelines
Sometimes rules are made to be broken, but not when it comes to launching your app on the App Store. You see, Apple is known for having manual reviewers, so before you even think of submitting your app for review, we highly recommend that you read the guidelines.
This is what you need to take into consideration in order to pass the app store review:
- Apple does respect all points of view presented in the App Store, as long as they do not cross the line. In case you are wondering what that line is, Apple’s reviewers like to say “I’ll know when I see it.”
- Apple penalizes system cheating, such as tricking the review process, stealing user data, copying other developers’ work, or manipulating ratings. If any of these cases happen, your app will be removed.
- You have to make sure everything in the app complies with the guidelines, including ad networks, analytics services, and third-party SDKs.
We’ll elaborate a bit on the last point in the upcoming section. But, all in all, before you plan to launch, make sure you read the guidelines carefully.
2. Test the app before submitting
So, you’ve read the guidelines and you’re confident that everything adheres to the Apple Guidelines. Great! But before you embark on the launching journey per se, it’s highly recommended to test your app. Here’s what you should do.
Design test
Before you submit your app for review, have another look at all the visual elements. Do the elements, menus, fonts, colors and titles look the way you want them to? For guidance, you can always check the iOS Human Interface Guidelines. They describe the basic principles for designing a user-friendly interface.

Usability & Security Testing
Although this usually happens during the production process, it’s not a bad idea to run a pretest to make sure your app is secure and easy to use. Think about it as a last proofreading before submitting.
Check to see how simple or difficult the navigation is. Put yourself in the user’s shoes and test everything, from scrolling aimlessly to performing a task. You can also ask a friend to give it a run to see if everything works as flawlessly as it should.
Also, in case your app requires a login, check it twice to see if it’s easy to log in and if you’ve enabled access control for pages, forms, RSS, and image feeds. Social login is also an option to add if you missed it beforehand.
3. Register for Apple’s developer program
Now that everything is in order, the next step is to create an Apple ID account. After that, you have to enroll in Apple’s Developer Program.

Before we dive in, it’s worth mentioning that the registration in Apple Program is charged on a yearly subscription. As a private individual or legal entity, you can enroll for $99 per year. If you want to register as a Developer Enterprise – in case you need to publish your apps in-house, the membership will cost $299 per year.
To register as a legal entity or as a Developer Enterprise, all you need is the Apple ID and following details:
- A D-U-N-S® Number
- Legal entity status
- Legal binding authority
- A website.
4. Set up your App Store Connect account & Xcode
The next step is to create your App Store Connect account. All you have to do is to go to https://developer.apple.com/, access “Account” and log in with the Apple ID you used to enroll in the Apple Developer Program. In case you are part of an organization as a user, you’ll have to be invited by someone in the team.
In case you haven’t downloaded Xcode yet, here are the steps you have to take:
- Add Developer Program account
- Click on “Accounts”. In the bottom left corner of the window, press the “+” sign and then “Add Apple ID…”, where you enter the one you used for Apple Developer Program and sign in.
- Select your team
Now you can launch a new project, and you will have a signing certificate – if you are part of the team. Otherwise, if you choose to build it individually, you will have the term “iPhone developer” plus your own email address.
Next, you go back to App Store Connect, select “My Apps”, click on the “+” sign and then “New App”.
In order to make a new App Store Connect record, you have to enter these details:
- Platform
- App name
- Default Language
- Bundle ID – this has to be identical with the one in Xcode, and you have to choose a reverse domain name. It has to start with .com.team.nameproject
- SKU – is not visible to the users, you can use it as an identifier for your company or anything else that matters to you.

Since you can’t change these details later, make sure you are content with the information you enter.
Then, you can build your app in Xcode. When it’s done, you choose the current build and you click on “Upload to App Store.”
CTA – Have a great idea for an iOS app? Let’s talk about how we can build it together.
Link to Product Discovery Workshop
5. Create your app store listing (Product page optimization)
Now it’s time to create your app store listing, also known as product page optimization. Here’s how it goes.
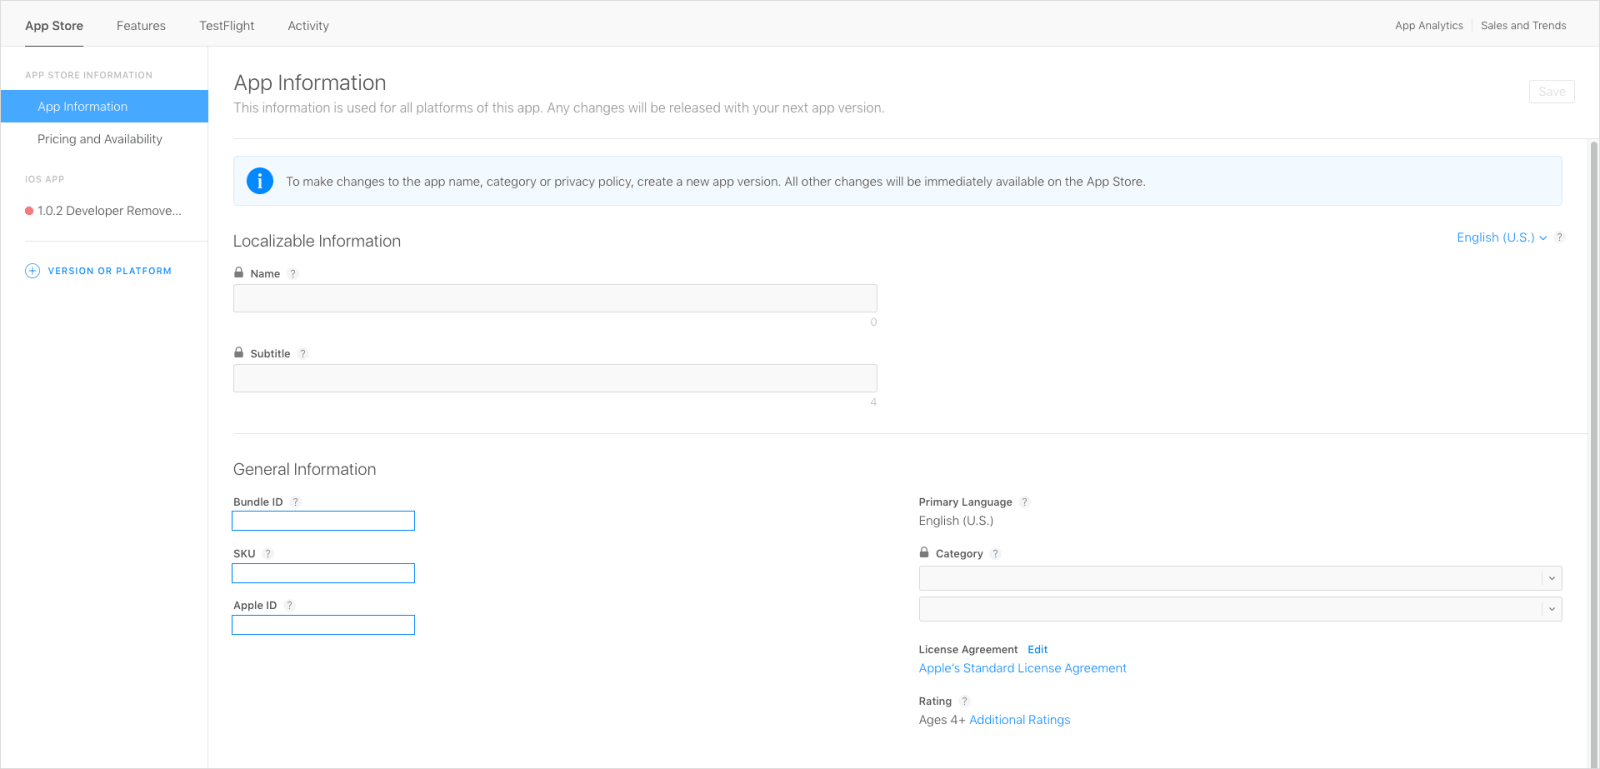
Meta data
In iTunes Connect, go ahead and access the “App Information” page, where you can add additional metadata information about your product. This information includes:
- App name
- Bundle ID (the one from Xcode)
- SKU (the one from Xcode)
- Apple ID – generates automatically
- Privacy Policy URL
- Primary Language – it’s usually the one that was set from Xcode
- Category – you can choose a primary category and a secondary one
- License agreement
- Rating – in case it’s not suitable for minors. Here, Apple will ask you to fill out a form. Based on your answers, your app will receive its rating.
- Additional information
Screenshots
Next, you go to the version you uploaded. It’s highly recommended to name these version on the XYZ principle, where:
- X represents a big update
- Y represents a smaller update
- Z relates to hot fixes or bug fixes.
Next you’ll need to upload a set of screenshots of the application, so that the user will know what to expect when downloading the app. It’s highly recommended to think about the screenshots as your store’s displays: they either convince the user or not. Make sure you choose the ones that represent your app the best and don’t choose the most plain – adding a video is also recommended.

Icon
Going to the “General App Information” section, you can upload your app’s icon, preferably in PNG format and 1024 by 1024 pixels. Then, you enter the version number (the XYZ principle), copyright, and contact information.
Before you can submit it to review, you have to choose the category and the rating – for the latter, you complete a questionnaire and the Apple team will give you the rating. It’s highly recommended for you to be honest. The app can be rejected during the review if it doesn’t match its rating.

6. Upload your iOS app to the App Store
You’ve finally reached the – almost – final phase of your journey. Scroll to the “Build” section in your app’s iTunes Connect, then click on “select a build before you submit your app.” Choose the build you uploaded through Xcode, click Done, and then “submit for review.”
Finally, you have to answer the Export Compliance, Content Rights and Advertising Identifier and to click “submit.” Now your app status should be “waiting for review.”
7. Submit your app for review
The app will be reviewed manually, so this process usually lasts between one and five days. Since it’s going to be reviewed by an actual person, you have to provide sign-in data for Apple, in case your app requires a login.
To make sure the review goes as smoothly as you wish, or if you believe the app is a bit difficult to use, you can write notes to guide reviewers on how to test the application. You can also add a personal contact to reach if they stumble upon something.
8. Release your iOS app!
There are three app status indicators that let you know if your app needs your attention.
- A red status indicator means that you have to perform some type of action before the app can be available on the App Store;
- A yellow status indicator lets you know that there is some ongoing process;
- A green status indicator signifies that your app is ready for sale.

For several details of each indicator and status, visit App Store Connect.
If everything goes well and you get the green light from Apple, you have two choices when it comes to publishing your app to the store. The first option is to schedule a date and a time for your app release, what we call automatic release. The second option is to release it manually from your App Store Connect dashboard.
This has been a rough guide on how to submit your mobile app to the App Store. But what if you’ve been working on an Android app? Read our next article on how to submit an Android app to Google Play!
Plan to develop your next top-notch digital product?

Bianca Gângă
Content Marketing Specialist
Bianca always wanted to be a writer - to craft fantastic stories or to be a professor at an Ivy League university. But since life decided that wasn't the path she should take, she yelled "PLOT TWIST" and became a communication professional, having the chance to work with challenging projects. She enjoys it, nonetheless, but still believes there is a huge need for dragons.


